Yamaha RX-A1060 Owner's Manual Page 21
- Page / 161
- Table of contents
- TROUBLESHOOTING
- BOOKMARKS
- Owner’s Manual 1
- CONTENTS 2
- CONFIGURATIONS 100 3
- APPENDIX 136 4
- Introduction 5
- FEATURES 6
- ⬛ AV CONTROLLER 7
- ⬛ AV SETUP GUIDE (for tablet) 7
- Part names and functions 8
- MULTI ZONE 9
- VIDEO AUX 9
- Front display (indicators) 10
- Rear panel 11
- Remote control 13
- PREPARATIONS 14
- 1 Connecting speakers 15
- Basic speaker configuration 16
- 5.1 system 17
- 2.1 system 18
- Presence speaker layout 18
- SPEAKER¡IMP 19
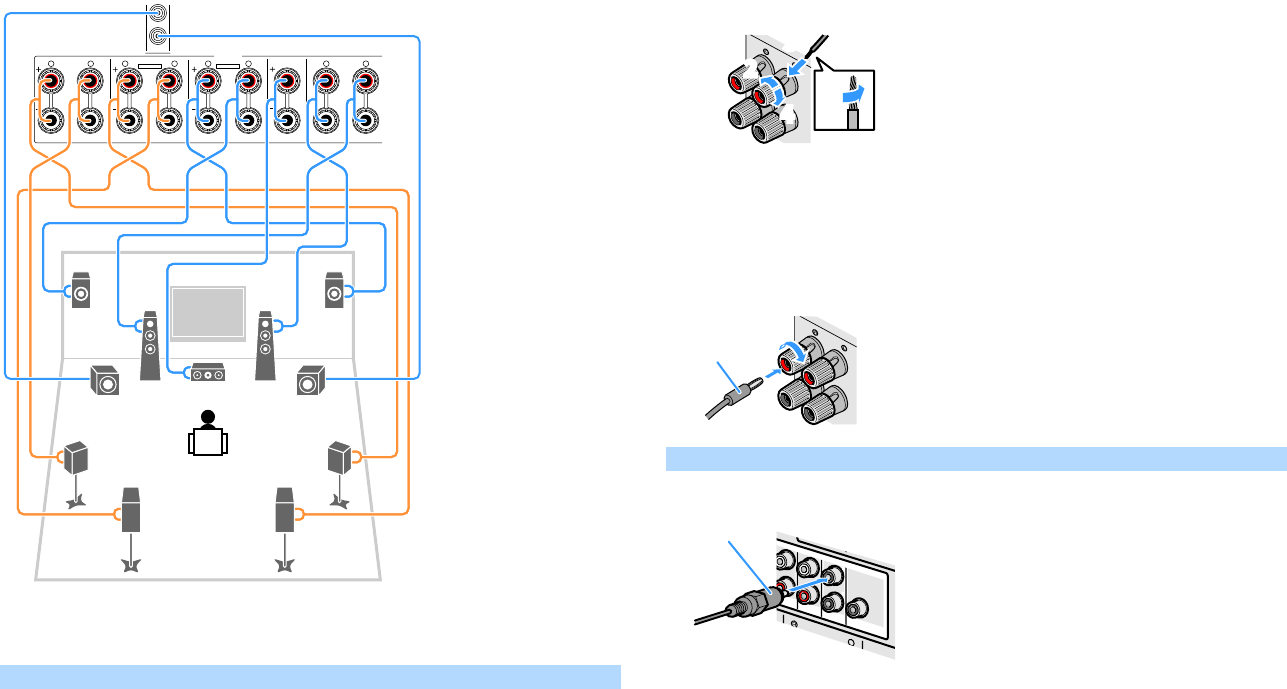
- ⬛ Connecting speakers 20
- Connecting speaker cables 21
- (Example) (Example) (Example) 22
- 7.1 +1Zone 23
- 5.1.2 +1Zone 24
- 5.1 Bi-Amp 24
- 7.1 Bi-Amp [ext.SB] 25
- R L R R RL L L 25
- EXTRA SP1EXTRA SP2 25
- ⬛ Connecting Zone2 speakers 26
- WIRELESS 27
- Input/output jacks and cables 28
- Connecting a TV 29
- MONITOR OUT/ 30
- ZONE OUT 30
- ⬛ HDMI connection 31
- ⬛ Component video connection 32
- ⬛ Composite video connection 32
- (HDCP2.2) 33
- Assembling the AM antenna 35
- Connecting the AM antenna 35
- Connecting the network cable 36
- VOLTAGE SELECTOR 37
- ON SCREEN 38
- YPAO MIC 40
- (single measure) 42
- (multi measure) 43
- Error messages 46
- Warning messages 47
- Searching for an access point 52
- Using the PIN code 53
- Settings 54
- None, WPA2-PSK (AES) 54
- MusicCast CONTROLLER 56
- PLAYBACK 57
- Press SCENE 58
- Registering a scene 59
- Selecting the sound mode 60
- CLASSICAL 61
- ENTERTAINMENT 62
- CLASSICAL 62
- LIVE/CLUB 63
- STRAIGHT 64
- PURE DIRECT 65
- Enhancer On 65
- Listening to FM/AM radio 66
- 01:FM 98.50MHz 67
- 01:Empty 67
- FM 98.50MHz 68
- TrafficProgram 68
- Operating the radio on the TV 69
- BLUETOOTH 70
- USB 72
- Menu operation keys 73
- External device 74
- Media sharing setup 75
- Playback of PC music contents 76
- Listening to Internet radio 79
- You can switch the language 81
- Preparing Zone2 85
- COMPONENT VIDEO 86
- L R RL L 87
- Controlling Zone2 88
- Setting range 89
- Registering an item 90
- Recalling a registered item 90
- Start the web browser 91
- Top menu screen 92
- Control screen 92
- Settings screen 93
- Viewing the current status 94
- Option menu items 95
- ⬛ Tone Control (Tone Control) 96
- ⬛ YPAO Volume (YPAO Volume) 96
- ⬛ Dialogue (Dialog) 97
- ⬛ Enhancer (Enhancer) 98
- ⬛ FM Mode (FM Mode) 99
- CONFIGURATIONS 100
- ⬛ Rename/Icon Select 101
- ⬛ Decoder Mode 101
- ⬛ Volume Interlock 101
- ⬛ DMC Control 102
- Scene menu items 103
- (DSP Program menu) 105
- DSP Program menu items 106
- ⬛ Settings for decoders 107
- Setup menu items 109
- Menu Item Function Page 111
- Speaker (Manual Setup) 112
- ⬛ Configuration 113
- ⬛ Distance 114
- ⬛ Parametric EQ 115
- ⬛ Test Tone 115
- ⬛ Lipsync 116
- ⬛ Dynamic Range 116
- ⬛ Max Volume 116
- ⬛ Video Mode 118
- ⬛ HDMI Control 119
- ⬛ Audio Output 119
- ⬛ Standby Through 120
- ⬛ Network Connection 120
- ⬛ IP Address 120
- ⬛ Network Standby 121
- ⬛ MAC Address Filter 121
- Bluetooth 122
- Multi Zone 123
- ⬛ Zone2 Set 124
- ⬛ Monitor Out Assign 125
- ⬛ HDMI OUT2 Assign 125
- ⬛ Party Mode Set 125
- Function 126
- ⬛ Memory Guard 127
- Language 128
- (Information menu) 129
- ⬛ HDMI Monitor 130
- ⬛ Network 130
- ⬛ System 130
- ⬛ Multi Zone 130
- (ADVANCED SETUP menu) 131
- REMOTE SENSOR 132
- REMOTE CON AMP 132
- TUNER FRQ STEP 132
- TV FORMAT 132
- MONITOR CHECK 133
- 4K MODE 133
- RECOV./BACKUP 133
- INITIALIZE 133
- FIRM UPDATE 134
- VERSION 134
- Cursor keys 135
- APPENDIX 136
- Troubleshooting 137
- FM/AM radio 141
- USB and network 143
- Glossary 146
- Audio Information (Others) 148
- HDMI and video information 148
- Network information 149
- Yamaha technologies 149
- Supported devices 150
- File formats 150
- Video signal flow 151
- Multi-zone output 152
- Information on HDMI 153
- Press ON SCREEN 154
- Audio Return Channel (ARC) 155
- HDMI signal compatibility 155
- (U.S.A. model) 156
- Trademarks 157
- Specifications 158
- Video Section 160
- FM Section 160
- AM section 160
- YH789A0/EN1 161
Related products and manuals for AV receivers Yamaha RX-A1060
 (88 pages)


 (690 pages)
(93 pages)
(93 pages)
(94 pages)
(74 pages)
(125 pages)
(98 pages)
(142 pages)
(111 pages)
(78 pages)
(73 pages)
(98 pages)
(2 pages)
(690 pages)
(93 pages)
(93 pages)
(94 pages)
(74 pages)
(125 pages)
(98 pages)
(142 pages)
(111 pages)
(78 pages)
(73 pages)
(98 pages)
(2 pages)

 (58 pages)
(161 pages)
(130 pages)
(86 pages)
(58 pages)
(161 pages)
(130 pages)
(86 pages)
© 2020, manymanuals.com. All rights reserved. | 0.092 s |
 Manymanuals.com
 Manymanuals.de
 Manymanuals.fr
 Manymanuals.it
 Manymanuals.pl
 Manymanuals.cz
 Manymanuals.es
 Manymanuals-pt.com
Comments to this Manuals